Installation
Test Pulse — are my tests green?
Run your real test suite locally, see which file is running, get a clean health report — not 4 minutes of log spam.
Command reference: All Test Pulse commands · Short CLI overview · API key setup · Terminal tools
Test Pulse in one sentence
zephex check test auto-detects your test runner (bun, vitest, jest, pytest, go, cargo), runs it on your machine, parses JUnit + lcov artifacts, and prints a fix-first summary — pass/fail counts, coverage bar, per-file breakdown, failures with Expected/Received, and rerun commands.
Runs tests
Yes — locally
Codecov CLI only uploads reports your runner already wrote. Zephex runs the suite for you and structures the output.
Live progress
Per-file spinner + scroll
Animated status line shows current file, pass/fail counts, and elapsed time. Scroll lines print when each test file starts.
Failures
File:line + Expected/Received
Enriched from JUnit + runner output — not just "Test failed".
Billing
1 credit per full run
~10 test runs ≈ 10 credits from your monthly pool. Status/list/failures = 0 credits.
Why Test Pulse for daily dev
| Capability | Codecov / upload CLIs | Zephex Test Pulse |
|---|---|---|
| Execute tests | No — you run bun/pytest first | Yes — auto-detects runner + command |
| Terminal output | Upload logs; dashboard for details | Clean brief summary + expand commands |
| Live file progress | N/A (no local runner) | Spinner + per-file scroll lines |
| Failure context | JUnit upload → web Test Analytics | Expected/Received, line, rerun command in terminal |
| Flaky hints | Cloud Test Analytics (JUnit upload) | check test flaky from local history |
| Offline | Dry-run only; needs git + network | Full run works offline; cloud upload optional |
Codecov is excellent for CI dashboards, PR comments, and team history. Test Pulse is for you in Cursor right now — before push, after a refactor, when you need to know what broke without reading 1,000 log lines.
One package — no extra download
Test Pulse ships inside the same zephex npm package as MCP and terminal tools. You do not install a second tool or download Test Pulse separately.
| What | Size |
|---|---|
npx zephex download (gzip, cached by npm) | ~5 MB per version |
| On disk after install | ~25 MB — bundled cli.js + tools/server.js, zero runtime npm deps |
| Test Pulse extra | 0 MB — already in the bundle |
A separate npm package is not needed. Test Pulse is a CLI command, not a new dependency tree.
What you need
- Node.js 18+ — for
npx zephex/mcpcli - Your test runner — bun, vitest, jest, pytest, go, cargo (Zephex detects and runs it on your machine)
- API key for billed full runs — create one or
npx zephex init. Dev bypass:ZEPHEX_TEST_PULSE_FREE=1 - Project folder with tests — not your home directory (
~)
mcpcli is the short install name for the Zephex MCP CLI (npm package zephex). Same binary, same API key, same 10 tools — you can type mcpcli instead of zephex after a one-time install. Official package name on npm remains zephex; command aliases ship inside that package (v2.4.6+).
Node.js required (or alternatives)
Includes best download path and how many MB each option uses — see download sizes.
mcpcli, npx zephex, and npm install -g zephex are Node.js programs. They need Node.js 18+ and npm on your PATH (or Node inside Docker). Zephex in the browser or in an editor over HTTPS does not replace that for terminal Mode 2.
Quick answer: Most people should install Node.js LTS, restart the terminal, then run npm install -g zephex && mcpcli setup. Pick another row in the table only if Node or global install is not possible on your machine.
Recommended if you have nothing installed yet: official Node.js LTS from nodejs.org (one installer), then the Zephex CLI from npm. Total download is not huge — on the order of tens of MB for Node, plus about 2.4 MB for the CLI itself.
# Best download for most people (small + permanent):# 1) Node.js LTS installer — ~30 MB (Windows) or ~85 MB (macOS) one-time download# https://nodejs.org/en/download# 2) Then in terminal (Zephex CLI is only ~2–3 MB from npm):npm install -g zephexmcpcli setup # Smallest try-before-install (still needs Node for npx):npx zephex setup# First run downloads zephex (~2–3 MB) to npm cache; no huge SDK.| What you download | Approx. download | After install on disk |
|---|---|---|
| Node.js LTS (Windows .msi) — best base for most users | ~30 MB | ~100–250 MB |
| Node.js LTS (macOS .pkg) | ~84 MB | ~100–250 MB |
zephex CLI only (npm install -g zephex) | ~2.4 MB | ~3–20 MB in npm cache |
| npx zephex setup (no global install) | Same ~2.4 MB CLI on first run | Cached under ~/.npm; no separate “Zephex app” installer |
Docker node:22-alpine (no local Node) | ~45–60 MB image pull | Docker Desktop ~500+; image ~45–60 MB |
| Editor-only MCP (HTTPS + API key) | 0 MB CLI — config only | No Node required on laptop |
Sizes vary slightly by Node version and OS. You are not downloading a large IDE or a multi-GB SDK — just Node (if needed) and a small npm package. Tools run against https://zephex.dev/mcp; your project code is not uploaded as a full repo by default.
Step 1 — check what you already have:
node -vnpm -vwhich nodewhich npmv18.x,v20.x, orv22.x→ you are ready; skip to after Node is installed.command not found→ Node is missing; install below or use Docker / editor-only.v16or lower → upgrade Node; the CLI requires 18+.
Step 2 — pick the best path for you:
| Your situation | Best option | Notes |
|---|---|---|
| New user, can install software | Node.js LTS + npm install -g zephex && mcpcli setup | Recommended. Shortest commands: mcpcli, zepx, zephex. |
| Have Node, try before installing globally | npx zephex setup | ~5s first download; nothing permanent except credentials. |
| Use Bun instead of Node day-to-day | bun install -g zephex | Still a JS runtime; see Bun block below. |
| Use pnpm | pnpm add -g zephex | Same CLI; see pnpm block below. |
| No Node on host; Docker allowed | Docker + npx in container | Mount $HOME so credentials survive. |
| No Node, no Docker; only Cursor / Claude | Editor MCP (HTTP) | Mode 1 in editor — not the same as terminal mcpcli tools. |
| Corporate laptop, no installs | Manual JSON config | Paste MCP config + API key; setup wizard optional on another machine. |
| Only need terminal tools occasionally | npx zephex … per command | Needs Node each time; no global PATH entry. |
Download the LTS installer if you are unsure — it includes npm. After install, close and reopen your terminal (required on Windows so PATH updates).
# macOS — recommended for most users# Option A: Homebrew (developers)brew install node # Option B: Official LTS installer (everyone)# Download from https://nodejs.org/en/download# Run the .pkg, then restart Terminal # Option C: Version manager (multiple Node versions)# fnm: https://github.com/Schniz/fnm# nvm: https://github.com/nvm-sh/nvm# Windows — recommended for most users# Option A: winget (Windows 10/11)winget install OpenJS.NodeJS.LTS # Option B: Official LTS installer# https://nodejs.org/en/download — check "Add to PATH" during install# Then open a NEW Command Prompt or PowerShell window # Verify (new window):node -vnpm -v# Linux — pick one# Option A: NodeSource (Debian/Ubuntu)curl -fsSL https://deb.nodesource.com/setup_22.x | sudo -E bash -sudo apt-get install -y nodejs # Option B: Distro packages (may be older — need v18+)# sudo apt install nodejs npm # only if version >= 18 # Option C: nvm (no sudo, per-user)# curl -o- https://raw.githubusercontent.com/nvm-sh/nvm/v0.40.1/install.sh | bash# nvm install --lts# nvm use --ltsStep 3 — after Node works, run Zephex setup:
npm install -g zephex && mcpcli setupWithout global install (still needs Node + npm for npx):
npx zephex setupnpx -p zephex mcpcli setupThese still require a JavaScript runtime on the machine — not a substitute for “no Node at all.”
bun install -g zephexmcpcli setup# or one-shot:bunx zephex setuppnpm add -g zephexmcpcli setup# or one-shot:pnpm dlx zephex mcpcli setupNo Node on this computer? Use Docker (Node runs inside the image) or editor-only MCP. Docker still requires Docker Desktop / Engine on the host.
# Docker Desktop or Engine required on the hostdocker pull node:22-alpine # Setup (writes ~/.zephex + editor configs on YOUR machine)docker run -it --rm \ -v "$HOME:/root" \ -w /root \ node:22-alpine \ npx -y zephex setup # Terminal tool in your repo (mount project folder)cd /path/to/your-appdocker run -it --rm \ -v "$HOME:/root" \ -v "$(pwd):/work" \ -w /work \ node:22-alpine \ npx -y zephex get-contextOptional alias so daily commands look like local mcpcli:
# ~/.bashrc or ~/.zshrc — shorter daily commandsalias mcpcli='docker run -it --rm -v "$HOME:/root" -w "$(pwd):/work" -w /work node:22-alpine npx -y zephex' mcpcli setupmcpcli get-contextFull CLI in Docker guide · Windows paths: use %USERPROFILE% instead of $HOME in -v mounts.
If you only want MCP tools inside Cursor or Claude Code and never run commands in Terminal, you can connect over HTTPS without installing Node on your laptop. Terminal Mode 2 (mcpcli get-context, etc.) still needs Node or Docker somewhere.
# No local Node needed for Cursor / Claude Code (hosted HTTP)# 1. Create a key: https://zephex.dev/dashboard/api-keys# 2. In Cursor: Settings → MCP → add server URL:# https://zephex.dev/mcp# Header: Authorization: Bearer YOUR_API_KEY# Or run setup on ANY machine that has Node once, copy the key into the editor. # Full wizard (needs Node somewhere once):# mcpcli setup --cursor# "command not found: node" or "command not found: npx"# → Node is not installed OR not on your PATH.# Fix: install LTS from nodejs.org, restart terminal, run node -v again. # "mcpcli: command not found" after npm install -g# → Global npm bin not on PATH, or install did not finish.# Fix: npm install -g zephex# npm bin -g # add this folder to PATH# Or skip global: npx zephex setup # EACCEs / permission denied on npm install -g (macOS/Linux)# Fix: mkdir -p ~/.npm-global && npm config set prefix ~/.npm-global# Add to ~/.zshrc: export PATH="$HOME/.npm-global/bin:$PATH" # Old Node (v16 or below)# Fix: upgrade to Node 18+ LTS — zephex CLI will not run on EOL Node.| Question | Answer |
|---|---|
| Do I need Node.js to use Zephex at all? | Only for the terminal CLI (mcpcli / npx zephex). Editor MCP via hosted HTTPS (Cursor, Claude Code) can work without Node on your laptop if you paste an API key or HTTP config. Terminal tools always need Node somewhere — your machine or Docker. |
| What is the best install for a new user? | Install Node.js LTS from nodejs.org (includes npm), restart the terminal, then run: npm install -g zephex && mcpcli setup. That gives the shortest commands forever. |
| I cannot install software on my work laptop. | Use editor-only MCP (manual JSON or dashboard key) — see Install methods → Manual JSON. Or run setup once on a personal machine, copy the API key, paste into work editor config. Terminal CLI on the work machine may be blocked without Docker approval. |
| I have Node for another project — is that enough? | Yes, if node -v shows v18 or higher. You do not need a separate Node install for Zephex. Use the same npm/npx. |
| Does the AI editor install Node for me? | Sometimes. Cursor/VS Code may bundle npx for MCP stdio configs, but that does not put mcpcli on your system PATH for Mode 2 terminal use. For terminal tools, install Node yourself or use Docker. |
| Docker still needs something installed? | Docker Desktop (or docker CLI) on the host — not Node. The container image includes Node and runs npx zephex for you. |
| How many MB will this download? | Node.js LTS installer is roughly 30 MB (Windows) or 85 MB (macOS) — not hundreds of MB. The zephex CLI package from npm is about 2–3 MB. npx zephex setup only adds that CLI download on first run (cached after). Docker pulls a ~50 MB Node Alpine image plus the same small zephex package inside the container. |
| What is the best way to download if I have nothing installed? | Use the official Node.js LTS installer from nodejs.org (includes npm), restart your terminal, then run npm install -g zephex && mcpcli setup. That is the smallest hassle long-term. If you truly cannot install Node, use editor-only MCP (no download) or Docker if your IT allows it. |
More: Install methods (all 6) · Connect MCP · CLI in Docker · npx zephex
First time (any OS, Node already installed)
Pick one path — both work the first time you run setup:
Recommended — global install (shortest commands forever):
npm install -g zephex && mcpcli setupOne-shot without global install (pick one):
npx zephex setupnpx -p zephex mcpcli setupPlain mcpcli setup only works after npm install -g zephex (or the combined line above). That is expected — there is no separate npm package named mcpcli on the public registry.
After install — daily commands
mcpcli setupmcpcli get-contextmcpcli usagezepx helpzphx doctorAll of these run the same CLI: mcpcli, zepx, zphx, mcpz, zepcli, zephx, zephex.
Terminal-only vs editor MCP
MCP CLI (Mode 2) runs in your shell — no AI agent required. mcpcli setup when you pick Terminal / CLI only does not change Cursor/VS Code MCP config. Use mcpcli setup --cursor (or another flag) if you also want tools inside the editor.
logout vs disconnect: mcpcli logout removes only ~/.zephex terminal credentials — your editor can keep using MCP. mcpcli disconnect removes Zephex from an editor config and revokes the key — not the same as logout. You can use terminal tools and editor MCP together with one API key; you do not run two separate products.
Who can run it?
Anyone in the world can download and run mcpcli / zephex from npm (public CLI). Your hosted MCP tools at https://zephex.dev/mcp require your API key from setup — strangers cannot use your quota without a key. Keys stay in ~/.zephex (or editor config); nothing secret is baked into the npm package.
More
Connect MCP (editors) · Terminal tools · Full command list · Install & package names · Install methods (no Node / Docker / manual) · CLI in Docker
# One-off — downloads ~5 MB once (npm cache), then runsnpx -y zephex check test --dry-run # Global install — ~25 MB on disk, all commandsnpm install -g zephex && mcpcli setupzephex check test # Shipped in npm tarball: TEST-PULSE.md (open after install)Tests always run on your machine
Test Pulse is local-first. Your Mac runs bun/pytest/jest. Zephex parses the output and prints a clean report. Works on a plane — no AWS on your laptop.
| Step | Where |
|---|---|
| Detect runner + run tests | Your machine |
| Terminal report, list, fix-prompt | Your machine |
| Session cache (30 min) | ~/.zephex/test-sessions/ |
| Optional history upload | Zephex API proxy (cloud) — JSON summary only, never runs your tests |
| Credits (1 per full run) | Cloud API when online |
Offline? Full test runs work. status, list, fix-prompt work from local session. Cloud sync skipped is normal — not an error that blocks you.
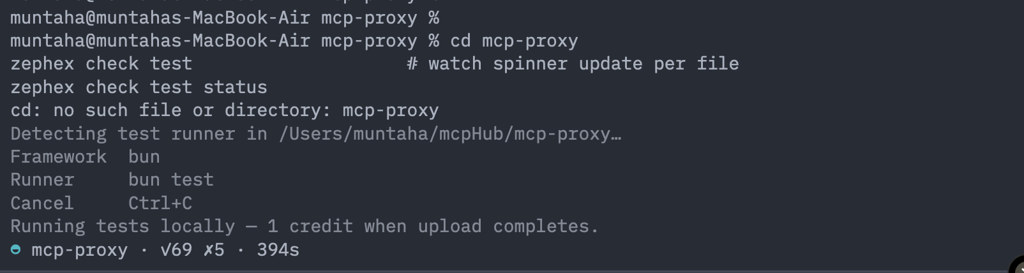
After install — first command
$ cd my-app$ npx -y zephex check test --dry-run Framework bunRunner bun test --coverageCancel Ctrl+CMode dry-run (command not executed)During a long run
Tests run on your machine (works offline). Optional cloud sync — 1 credit. ▸ tests/handlers.test.ts ✓12 ✗0 · 4s ▸ tests/mcp-tools.test.ts ✓57 ✗2 · 180sAfter a failing run
✗ my-app — 5 failed of 771 tests · 48.5% line coverage 5 tests failed across 3 files. Fix the failures below, then re-run. Failures (fix first) 1. auth.test.ts › rejects expired token Expected: 401 ↳ bun test tests/auth.test.ts -t "rejects expired token" ════════════════════════════════════════════════════════ Fix with AI — copy this into Cursor or Claude Code ⎘ zephex check test fix-prompt --copy════════════════════════════════════════════════════════ Next steps ⎘ zephex check test fix-prompt --copy AI fix prompt → clipboard zephex check test list Every test file (bigger list)zephex check test learn prints the same guide in your terminal. Full command list: commands reference.
Open your project in Cursor / VS Code
Use the integrated terminal — cwd is set to your project automatically. Do not run from ~ (home); Zephex will not auto-pick a random folder.
cd into the package that has tests
Monorepo? cd mcp-proxy (or your app folder). Or use zephex check test --cwd mcp-proxy from the repo root.
Run the health check
cd your-appzephex check testYou'll see a pre-run banner (framework, runner command, Ctrl+C hint), then the animated spinner while tests run, then the brief report.
Watch live progress (long suites)
On a big suite (85 files, 5+ minutes), the spinner shows the current test file, file count, ✓/✗ totals, and elapsed seconds. Scroll lines print in stderr when each file starts. Press Ctrl+C once to cancel; twice to force quit.
Drill down (0 credits)
zephex check test status # health dashboard + coverage barzephex check test failures # Expected/Received detailszephex check test list # every test file ✓/✗zephex check test --full # coverage table + slow testsWhat you see during a long run
The #1 complaint on long suites: minutes pass and you only see the project name with pass/fail counts — no idea which file is running. Test Pulse fixes that with two layers of feedback:
Spinner line (updates in place)
Current file + suite stats
handlers.test.ts · 12 files · ✓69 ✗5 · 180s
Scroll lines (print once per file)
Permanent history in terminal
▸ tests/mcp-tools.test.ts · ✓45 ✗2 · 180s
Before — only project label for minutes
On spawned (non-TTY) bun output, file headers are often missing. Without parsing(pass) tests/foo.test.ts lines, the spinner stuck on the project name:
Long suite (~6 min) — spinner had ✓/✗ counts and elapsed time but not which file was running. This is what we fixed.
After — file name in spinner + scrollback
Detecting test runner in /Users/you/my-app…Framework bunRunner bun test --coverageCancel Ctrl+CRunning tests locally — 1 credit when upload completes. ◐ handlers.test.ts · 1 files · ✓12 ✗0 · 4s ▸ tests/handlers.test.ts · ✓12 ✗0 · 4s◓ mcp-tools.test.ts · 2 files · ✓57 ✗2 · 180s ▸ tests/mcp-tools.test.ts · ✓57 ✗2 · 180s◑ auth.test.ts · 3 files · ✓89 ✗2 · 240s ▸ src/__tests__/auth.test.ts · ✓89 ✗2 · 240s…Scroll lines also refresh every 12s during long gaps inside a single file (slow integration tests). Full details: Live progress in commands.
After the run — brief report (not raw logs)
zephex check test · mcp-proxy────────────────────────────────────────────────────────Runner bun test --coverage (auto-detected)Duration 340.7s Inventory 85 files · 771 tests · 21 skipped Result ✓ 749 ✗ 1 » 21 skipped FAIL Coverage Lines 48.5% (27,703 / 57,175 lines) 3 files at 0% coverage Failures (fix first) 1. mcp-http-express-hardening.test.ts › stateless mode still requires auth Test failed Rerun: bun test tests/mcp-http-express-hardening.test.ts -t "stateless mode…" Show more check test list all test files check test failures failure details only check test --full coverage + slow + skippedAfter tests fail — copy a fix prompt
Test Pulse builds a rich prompt for your AI agent: failing tests, file paths, Expected/Received, reproduce commands, and what to fix. No pass-rate fluff.
zephex check test fix-prompt --copy# Paste into Cursor / Claude Code — agent gets full failure context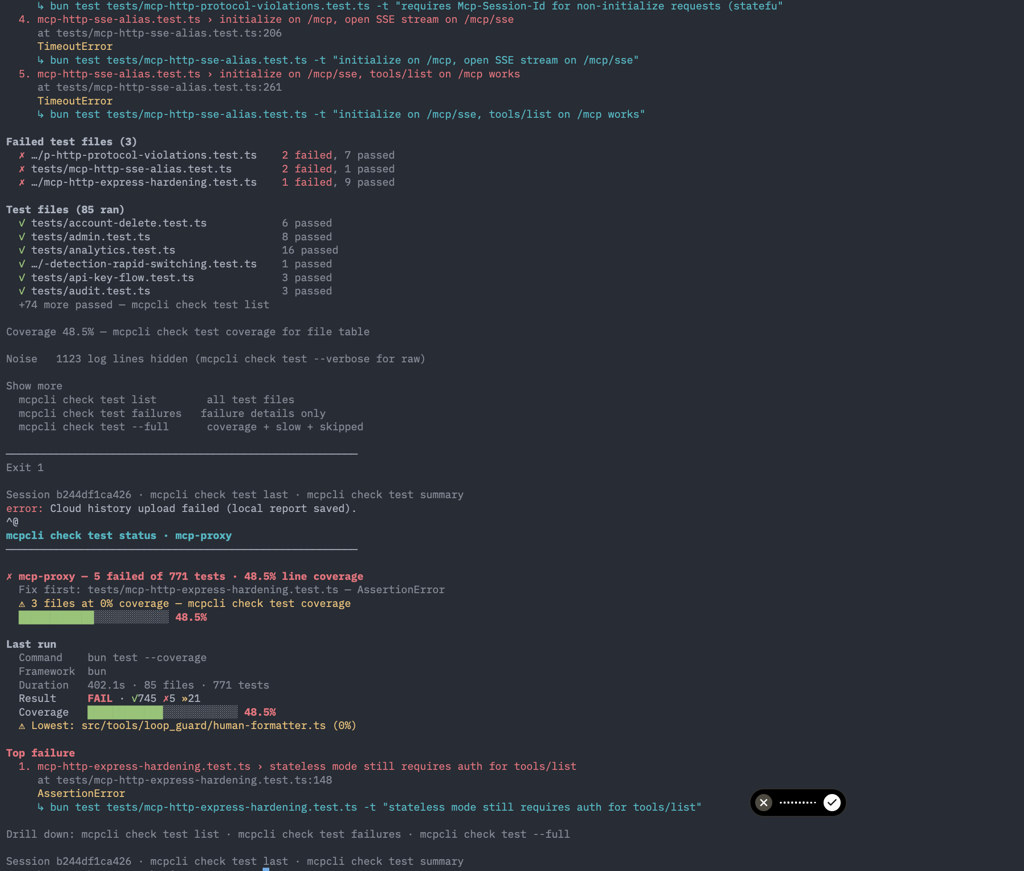
Failed run — brief report with green passed files, red failures, and Next steps footer pointing at fix-prompt --copy.
Most-used commands
zephex check test # brief summary + failureszephex check test learn # what commands do (terminal guide)zephex check test fix-prompt --copy # AI fix prompt → clipboardzephex check test --command "bun test src/foo.test.ts" # one filezephex check test --dry-run # show detected command (0 credits)zephex check test --failed-only # rerun last failureszephex check test --diff main # patch coverage on changed lineszephex check test --flaky # record + show flaky hintsZEPHEX_TEST_PULSE_FREE=1 zephex check test # dev: skip billingFull command list with every flag and subcommand: Test Pulse commands reference.
macOS, Linux, Windows
- macOS / Linux: Works in Terminal, iTerm, Cursor integrated terminal. Ctrl+C cancels via process-group kill.
- Windows: PowerShell or Git Bash; use
cd your-appthenzephex check test. - CI / agents: Use
--jsonfor machine-readable output; progress emits scroll lines on stderr.
Artifacts: .zephex/test-run/junit.xml and lcov.info (gitignored). Session cache: ~/.zephex/test-sessions/ (30 min) powers status, list, and failures without re-running.