CLI
Zephex CLI — full command reference
How to use Mode 2 day-to-day, then every account command and terminal tool. Account (setup, logout, disconnect) plus get-context, find-code, check-test, packages, live audits. Source: src/cli.ts.
Start here: Install & upgrade the CLI · CLI without an AI agent · Terminal guide · Account & logout
Two names, one CLI
After install you get both commands. They are not two products. The installer links zephex and mcpcli to the same file. Use the product name if that is easier to remember. Use mcpcli if that is what you already typed last month. Nothing breaks if you mix them in one terminal.
zephex overviewmcpcli overview # same CLI, same result zephex loginmcpcli login # same CLI, same result zephex doctormcpcli doctor # same CLI, same result zephex update --checkmcpcli update --check # same CLI, same result zephex usagemcpcli usage # same CLI, same resultExtra aliases (same file again): zepx zphx mcpz zepcli zephx. You never have to memorize those. Slash commands inside the TUI (/overview) do not care which binary you launched.
Zephex CLI is a terminal product that talks to the same hosted intelligence as your editor MCP — but answers in plain English for humans. You install once, sign in once, then run short commands from any project folder: stack brief, find a symbol, outline a file, check if a package is safe, run tests, or audit a live URL. No agent loop required.
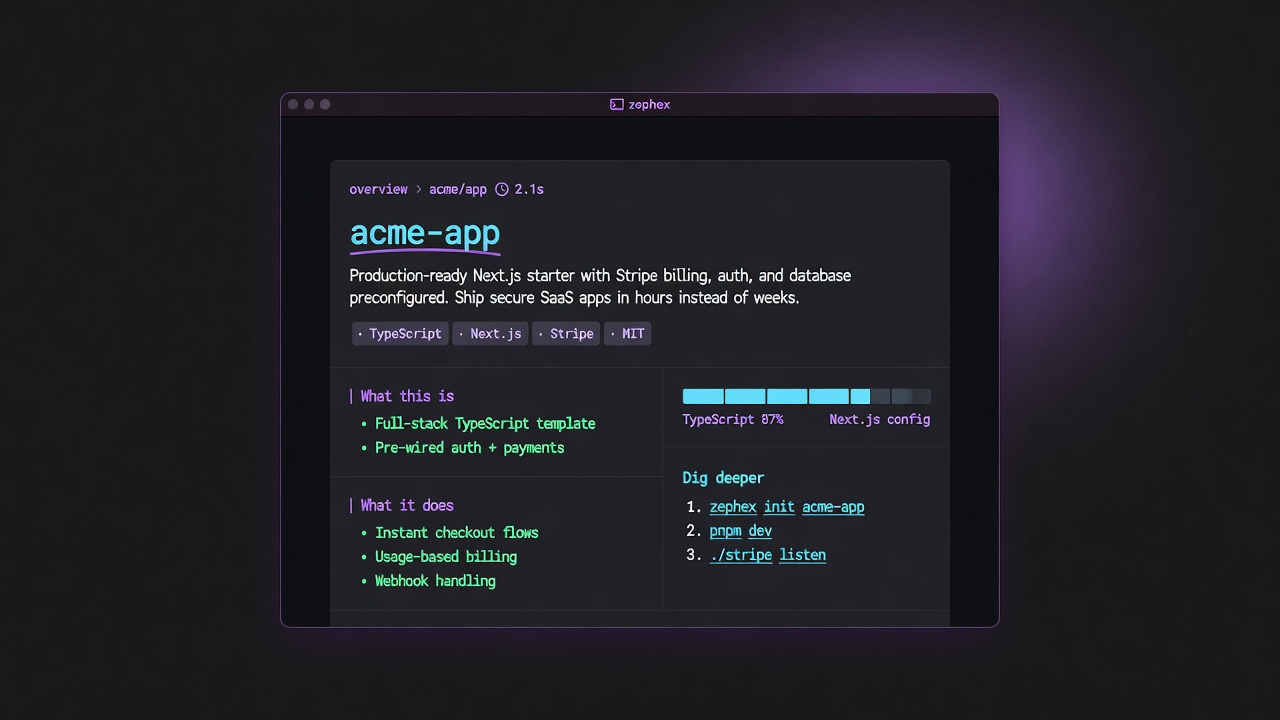
What a good Mode 2 reply looks like: short hero, plain English, · tags, │ sections, numbered Dig deeper — not a wall of chat.
The craft: answer cards, not chat dumps
Mode 2 is designed like a senior engineer sitting next to you — not like a chat model monologue. Each successful tool prints a structured answer card:
Hero first
Project name, package name, or search query in high contrast — so you know what you’re looking at in half a second.
Plain English story
Two to four sentences on what it is and how you’d use it. Badges and marketing noise are stripped before display.
· tags + │ rails
Stack, license, and scale as a quiet tag strip. Sections use a left rail so your eye can scan What this is / What it does / Getting started.
Dig deeper
Numbered next commands (architecture, find-code, setup…) so you never dead-end after one answer.
Honesty
If a section has no real data, it is dropped — Zephex does not invent stack or print “none detected” filler.
Human ≠ agent
Default output is the card. Pass --json when you want the same lean payload your editor agent sees.
| Who | When | Try |
|---|---|---|
| Solo builders | Before opening the editor — orient on a new clone in under a minute. | mcpcli overview |
| Teams onboarding | Hand a new hire five commands instead of a 40-page wiki. | mcpcli get-context · mcpcli architecture |
| Security-minded deploys | Before npm install, or after shipping a public URL. | mcpcli safe express · mcpcli check url https://your.app |
| Monorepo maintainers | Point tools at one package without losing the root workspace. | mcpcli find-code "auth" --cwd apps/web |
| CI / scripts | Pipe machine-readable results into bots or logs. | mcpcli get-context --json · mcpcli deps --json |
| Editor users who also live in the shell | Same API key as Cursor / Claude — terminal for speed, MCP for multi-step agent work. | mcpcli setup --cursor then mcpcli find-code "…" |
# 1) Install (no Node required)curl -fsSL https://zephex.dev/cli/install.sh | bashsource ~/.zephex/env.sh# Windows: irm https://zephex.dev/install.ps1 | iex # 2) Sign in (browser → saves ~/.zephex/credentials.json)zephex init --terminal# or: zephex login # 3) Stand in a real project (package.json + source)cd ~/projects/my-app # 4) First answers — plain English cardsmcpcli overviewmcpcli get-contextmcpcli find-code "auth"mcpcli safe expressmcpcli check-test # 5) Optional: wire an editor toomcpcli connect --cursor # 6) Healthmcpcli doctormcpcli usageLearn these ten first. Everything else is aliases, Power Mode, or Pulse product lines.
| Command | What you get |
|---|---|
overview | Product story + stack bars + how to run |
get-context | Structured project brief (topics: auth, database, …) |
find-code | Search symbols, strings, renames |
summarize | Plain-English file read (read_code) |
check-test | Run tests + failures / why |
safe | Is this npm package safe to install? |
architecture | How the app is wired |
check url | Live URL header / TLS audit |
remember | Save a project fact for later sessions |
connect | Wire Cursor / VS Code / Claude / 22+ editors |
New repo clone — “what is this?”
- cd into the app (or apps/web in a monorepo)
- mcpcli overview — product story, size, how to run
- mcpcli get-context — stack, scripts, env names
- mcpcli architecture — how modules wire together
cd my-appmcpcli overviewmcpcli get-contextmcpcli architecture --focus authFind a symbol, then read it
- mcpcli find-code "validateToken" — ranked hits
- mcpcli symbol validateToken — AST body
- mcpcli summarize src/lib/auth.ts — plain-English file brief
mcpcli find-code "validateToken"mcpcli symbol validateTokenmcpcli summarize src/lib/auth.tsBefore you npm install
- mcpcli safe <pkg> — CVEs + registry risk (no project required)
- mcpcli check-package next --task upgrade --from-version 14.2.0
- mcpcli deps — scan every direct dependency in package.json
mcpcli safe lodashmcpcli check-package next --task upgrade --from-version 14.2.0mcpcli depsSTEP 1
You type a short command (or plain English)
Intent routing maps typos and phrases to the right tool — no LLM in the loop for routing. Example: mcpcli "tell me about my project" → get-context.
STEP 2
Local project is indexed from your disk
By default Zephex uploads manifests + a bounded file set (inline_files) from your current folder — private repos work without a public GitHub URL.
STEP 3
Hosted tools analyze at zephex.dev/mcp
Same API key as editor MCP. Usage counts toward your plan. Failures on empty folders fail fast so you do not burn quota from ~.
STEP 4
Terminal renders an answer card
Hero, plain English, tags, sections, Dig deeper. --json skips the card and prints the agent payload.
On a TTY, bare mcpcli opens a shell. Type / for the palette — Tab fills, Enter runs.
mcpcli # bare + TTY → interactive shell, type //overview # slash palette (Tab to fill, Enter to run)/find auth/safe express/login # if not signed inmcpcli help terminal # full Mode 2 alias listmcpcli learn find_code # per-tool guide, no API call| Mistake | Fix |
|---|---|
| Running from ~ or /tmp | cd into a folder with package.json (or pyproject.toml / go.mod) first. |
| Expecting full monorepo search from the root always | Use mcpcli … --cwd packages/api or cd into the package you care about. |
| Confusing remember with package upgrade | remember/recall = project_memory facts. Package upgrades = mcpcli check-package --task upgrade (legacy: loop-guard). |
| Assuming multi-turn think works like the editor | Terminal mcpcli think is one-shot. Full keep_thinking sessions with sessionId are editor MCP. |
| Using an old global binary | mcpcli update --apply or re-run curl -fsSL https://zephex.dev/cli/install.sh | bash — then mcpcli doctor. |
Editor agents receive lean JSON. Terminal humans get answer cards. Quota is shared.
Keys are hashed. Usage metadata is logged. Tool payloads are request-scoped. Terminal credentials stay on your machine.
Bare words can mean more than one feature. Dispatch order in the CLI is product policy — not a bug. Prefer explicit flags when you need the other meaning.
| You type | CLI runs | If you wanted something else |
|---|---|---|
structure | structure (file map — free GitHub tree / local inventory) | mcpcli architecture for wiring · mcpcli overview for product story |
env | env-check (local env gaps) | mcpcli get-context --topic env |
upgrade (no args) | CLI self-update | mcpcli upgrade next or mcpcli check-package next --task upgrade |
test / check-test | check_test (Test Pulse) | Package named test → check-package test |
check url … | audit_headers | — |
secrets | supply --only secrets | — |
remember / recall | project_memory | Not package upgrade (loop-guard) |
loop-guard / audit | check-package --task upgrade | Prefer check-package --task upgrade |
Full maintainer table: /docs/cli-dispatch-policy.md (also in the monorepo under docs/cli-dispatch-policy.md).
| Tier | Requests / month | Price |
|---|---|---|
| Free | 555 | $0/mo |
| Pro | 3,500 | $7/mo |
| Max | 10,000 | $19/mo |
| Error | Meaning |
|---|---|
-32002 / HTTP 429 | Burst / rate limit — respect Retry-After |
-32003 | Monthly quota or per-key cap exceeded |
-32001 | Auth failure (invalid/expired key) |
- Same account quota applies to editor MCP and terminal CLI.
- overview may run multiple internal analyses but bills as documented for that product path.
- help / learn / compass (local) do not burn hosted credits.
Response headers often include: X-RateLimit-Limit · X-RateLimit-Remaining · X-RateLimit-Reset · Retry-After (on 429).
- HTTPS only to zephex.dev — TLS for all client traffic.
- API keys hashed at rest; never log full secrets in production paths.
- Rate limits per key via Upstash-style sliding windows; 429 + Retry-After.
- Dashboard uses secure cookie flags on session auth; MCP uses Bearer keys.
- Tool allowlisting on the server — arbitrary tool names from clients are rejected.
- Local CLI credentials: ~/.zephex/credentials.json with restrictive file mode.
curl installer — terminal CLI (Mode 2)
This one-liner is the Mode 2 terminal installer — the same zephex shell you type / in. It is not the editor MCP wizard on the homepage (npx -p zephex mcpcli setup). Same account and API key later; different first command.
curl -fsSL https://zephex.dev/cli/install.sh | bashSame script lives at both URLs (use either):
curl -fsSL https://zephex.dev/cli/install.sh | bash# aliascurl -fsSL https://zephex.dev/install.sh | bashWhat it does
- Installs into
~/.zephex(or%USERPROFILE%\.zephexon Windows) — not into your project. - If your system Node is missing or older than 22.5, it downloads a private Node 22 runtime (~50 MB compressed, once) under
~/.zephex/node. - Downloads the
zephexnpm tarball only (~3 MB today, ~13 MB unpacked) into~/.zephex/npm-globaland linkszephex+mcpcli. It does not runnpm install -g— that would also pull unused server libraries (~260 MB). - Starts
zephex init --terminalso you can sign in in the browser. It does not write Cursor / Claude / VS Code MCP config. Editor wiring iszephex connect --cursor(ornpx -y zephex@latest setup --cursor).
By operating system
macOS (Intel or Apple Silicon) — Terminal or iTerm. Needs curl (already there). After install, new Terminal windows pick up PATH from ~/.zshrc and ~/.zprofile. The current window still needs:
source ~/.zephex/env.shLinux (x64 or arm64) — bash, zsh, or fish. Same curl line. PATH is appended to ~/.bashrc / ~/.profile (and fish config if needed). If you installed as one user and launch the desktop as another, the binary will not be on PATH — stay on the same account.
Windows — do not pipe the bash installer in cmd.exe. Use PowerShell:
irm https://zephex.dev/install.ps1 | iexWSL or Git Bash: use the macOS/Linux curl line inside that Linux environment. Mixing C:\Users\…\.zephex with /home/you/.zephex is the usual break.
Cloud shells, phones, other OS
- Google Cloud Shell, GitHub Codespaces, Railway / Render shells — use the same curl line. Those boxes often ship Node 18 or 20. The installer notices and downloads a private Node 22 under
~/.zephex/nodeinstead of failing. Do not usenpx zephex setupthere unlessnode -vis already 22.5+. - Android (Termux) — curl + bash work. Same installer. Hosted commands still need HTTPS out to zephex.dev.
- iPhone / iPad — there is no native
zephexbinary. Use the web terminal in Safari, or SSH into a Mac/Linux box that already has the CLI. - Windows ARM (Surface, Snapdragon) — PowerShell installer downloads the
win-arm64Node build. WSL on ARM uses the Linux arm64 curl line.
What the CLI talks to
- Install download — Vercel serves
install.sh/install.ps1. The CLI itself comes from the npm registry, not from Railway. - Sign-in — browser or QR hits
zephex.dev/cli/auth(Vercel). Youruser_idand key name are written to Supabase. The API key is stored only in~/.zephex/credentials.json(mode 0600). - Tool commands (
/overview,/architecture, …) go to the hosted MCP proxy on Railway (https://zephex.dev/mcpis the public URL). Credits and tool names are stored peruser_idinusage_events. - Sentry — Railway captures hosted tool / API errors (tagged with CLI version). The local
zephexprocess does not send your repo to Sentry.
After install — first commands
source ~/.zephex/env.shcd your-appzephex# type /overview or /helpHosted tools need a live API key (dashboard keys or the browser sign-in the installer opens). /help and /learn work without a key. /frontend /auth /database /overview do not.
Upgrade
The curl script always installs npm zephex@latest (unless you pin ZEPHEX_VERSION). Re-run it, or:
zephex update # or re-run the installer (installs npm zephex@latest into ~/.zephex)curl -fsSL https://zephex.dev/cli/install.sh | bash # pin a versionZEPHEX_VERSION=2.5.13 curl -fsSL https://zephex.dev/cli/install.sh | bashCheck what you have: zephex info or zephex --version. If which zephex points at an old global npm (not ~/.zephex/bin/zephex), source ~/.zephex/env.sh or reopen the terminal.
This vs the homepage npx line
curl -fsSL https://zephex.dev/cli/install.sh | bash— install the terminal (Mode 2). No Node required on the machine first.npx -p zephex mcpcli setup— editor MCP wizard (Mode 1). Needs Node already. Writes Cursor / Claude config.- You can use both with one API key. Install the CLI first, then
zephex connect --cursorwhen you want the editor.
Uninstall
zephex uninstall # PATH + credentialszephex uninstall --full # delete entire ~/.zephexIf something looks stuck
command not found: zephex—source ~/.zephex/env.sh, then open a new tab.- Piped curl into bash: the installer cannot keep PATH in that parent shell. That is why it prints the
sourceline. - Only run the script from
zephex.dev— never a random gist. - Offline or corporate TLS intercept: the script needs HTTPS to zephex.dev (npm package) and, if Node is missing, nodejs.org.
More paths: all install methods · macOS · Linux · Windows · terminal CLI
mcpcli is the short install name for the Zephex MCP CLI (npm package zephex). Same binary, same API key, same 10 tools — you can type mcpcli instead of zephex after a one-time install. Official package name on npm remains zephex; command aliases ship inside that package (v2.4.6+).
Node.js required (or alternatives)
Includes best download path and how many MB each option uses — see download sizes.
mcpcli, npx zephex, and npm install -g zephex are Node.js programs. They need Node.js 22+ and npm on your PATH (or Node inside Docker). Zephex in the browser or in an editor over HTTPS does not replace that for terminal Mode 2.
Quick answer: Most people should install Node.js LTS, restart the terminal, then run npm install -g zephex && mcpcli setup. Pick another row in the table only if Node or global install is not possible on your machine.
Recommended if you have nothing installed yet: official Node.js LTS from nodejs.org or skip Node entirely with the curl installer (~3 MB CLI tarball). npm install -g zephex currently unpacks ~260 MB of unused deps — prefer curl.
# Best download — no Node required (~3 MB CLI; +~50 MB Node only if missing)curl -fsSL https://zephex.dev/cli/install.sh | bash # Already have Node 22.5+ and want editor MCP only:npx -y zephex@latest setup --cursor # Avoid until slim publish: npm install -g zephex / bare npx zephex# Those currently also install unused server libraries (~260 MB).| What you download | Approx. download | After install on disk |
|---|---|---|
| Node.js LTS (Windows .msi) — best base for most users | ~30 MB | ~100–250 MB |
| Node.js LTS (macOS .pkg) | ~84 MB | ~100–250 MB |
zephex CLI only (npm install -g zephex) | ~3 MB | ~260 MB in npm cache |
| npx zephex setup (no global install) | Same ~3 MB CLI on first run | Cached under ~/.npm; no separate “Zephex app” installer |
Docker node:22-alpine (no local Node) | ~45–60 MB image pull | Docker Desktop ~500+; image ~45–60 MB |
| Editor-only MCP (HTTPS + API key) | 0 MB CLI — config only | No Node required on laptop |
Sizes vary slightly by Node version and OS. You are not downloading a large IDE or a multi-GB SDK — just Node (if needed) and a small npm package. Tools run against https://zephex.dev/mcp; your project code is not uploaded as a full repo by default.
Step 1 — check what you already have:
node -vnpm -vwhich nodewhich npmv18.x,v20.x, orv22.x→ you are ready; skip to after Node is installed.command not found→ Node is missing; install below or use Docker / editor-only.v16or lower → upgrade Node; the CLI requires 22+.
Step 2 — pick the best path for you:
| Your situation | Best option | Notes |
|---|---|---|
| New user, can install software | Node.js LTS + npm install -g zephex && mcpcli setup | Recommended. Shortest commands: mcpcli, zepx, zephex. |
| Have Node, try before installing globally | npx zephex setup | ~5s first download; nothing permanent except credentials. |
| Use Bun instead of Node day-to-day | bun install -g zephex | Still a JS runtime; see Bun block below. |
| Use pnpm | pnpm add -g zephex | Same CLI; see pnpm block below. |
| No Node on host; Docker allowed | Docker + npx in container | Mount $HOME so credentials survive. |
| No Node, no Docker; only Cursor / Claude | Editor MCP (HTTP) | Mode 1 in editor — not the same as terminal mcpcli tools. |
| Corporate laptop, no installs | Manual JSON config | Paste MCP config + API key; setup wizard optional on another machine. |
| Only need terminal tools occasionally | npx zephex … per command | Needs Node each time; no global PATH entry. |
Download the LTS installer if you are unsure — it includes npm. After install, close and reopen your terminal (required on Windows so PATH updates).
# macOS — recommended for most users# Option A: Homebrew (developers)brew install node # Option B: Official LTS installer (everyone)# Download from https://nodejs.org/en/download# Run the .pkg, then restart Terminal # Option C: Version manager (multiple Node versions)# fnm: https://github.com/Schniz/fnm# nvm: https://github.com/nvm-sh/nvm# Windows — recommended for most users# Option A: winget (Windows 10/11)winget install OpenJS.NodeJS.LTS # Option B: Official LTS installer# https://nodejs.org/en/download — check "Add to PATH" during install# Then open a NEW Command Prompt or PowerShell window # Verify (new window):node -vnpm -v# Linux — pick one# Option A: NodeSource (Debian/Ubuntu)curl -fsSL https://deb.nodesource.com/setup_22.x | sudo -E bash -sudo apt-get install -y nodejs # Option B: Distro packages (may be older — need v18+)# sudo apt install nodejs npm # only if version >= 18 # Option C: nvm (no sudo, per-user)# curl -o- https://raw.githubusercontent.com/nvm-sh/nvm/v0.40.1/install.sh | bash# nvm install --lts# nvm use --ltsStep 3 — after Node works, run Zephex setup:
npm install -g zephex && mcpcli setupWithout global install (still needs Node + npm for npx):
npx zephex setupnpx -p zephex mcpcli setupThese still require a JavaScript runtime on the machine — not a substitute for “no Node at all.”
bun install -g zephexmcpcli setup# or one-shot:bunx zephex setuppnpm add -g zephexmcpcli setup# or one-shot:pnpm dlx zephex mcpcli setupNo Node on this computer? Use Docker (Node runs inside the image) or editor-only MCP. Docker still requires Docker Desktop / Engine on the host.
# Docker Desktop or Engine required on the hostdocker pull node:22-alpine # Setup (writes ~/.zephex + editor configs on YOUR machine)docker run -it --rm \ -v "$HOME:/root" \ -w /root \ node:22-alpine \ npx -y zephex setup # Terminal tool in your repo (mount project folder)cd /path/to/your-appdocker run -it --rm \ -v "$HOME:/root" \ -v "$(pwd):/work" \ -w /work \ node:22-alpine \ npx -y zephex get-contextOptional alias so daily commands look like local mcpcli:
# ~/.bashrc or ~/.zshrc — shorter daily commandsalias mcpcli='docker run -it --rm -v "$HOME:/root" -w "$(pwd):/work" -w /work node:22-alpine npx -y zephex' mcpcli setupmcpcli get-contextFull CLI in Docker guide · Windows paths: use %USERPROFILE% instead of $HOME in -v mounts.
If you only want MCP tools inside Cursor or Claude Code and never run commands in Terminal, you can connect over HTTPS without installing Node on your laptop. Terminal Mode 2 (mcpcli get-context, etc.) still needs Node or Docker somewhere.
# No local Node needed for Cursor / Claude Code (hosted HTTP)# 1. Create a key: https://zephex.dev/dashboard/api-keys# 2. In Cursor: Settings → MCP → add server URL:# https://zephex.dev/mcp# Header: Authorization: Bearer YOUR_API_KEY# Or run setup on ANY machine that has Node once, copy the key into the editor. # Full wizard (needs Node somewhere once):# mcpcli setup --cursor# "command not found: node" or "command not found: npx"# → Node is not installed OR not on your PATH.# Fix: install LTS from nodejs.org, restart terminal, run node -v again. # "mcpcli: command not found" after npm install -g# → Global npm bin not on PATH, or install did not finish.# Fix: npm install -g zephex# npm bin -g # add this folder to PATH# Or skip global: npx zephex setup # EACCEs / permission denied on npm install -g (macOS/Linux)# Fix: mkdir -p ~/.npm-global && npm config set prefix ~/.npm-global# Add to ~/.zshrc: export PATH="$HOME/.npm-global/bin:$PATH" # Old Node (v16 or below)# Fix: upgrade to Node 22.5+ — or use curl install.sh, which bundles Node.| Question | Answer |
|---|---|
| Do I need Node.js to use Zephex at all? | Not for the curl installer — it bundles Node 22 under ~/.zephex if needed. npx / npm / bun still need Node 22.5+ on PATH. Editor MCP over HTTPS can work with only an API key. |
| What is the best install for a new user? | curl -fsSL https://zephex.dev/cli/install.sh | bash — then source ~/.zephex/env.sh. That works with or without Node. Use npx zephex setup --cursor only when you already have Node 22.5+ and want editor MCP. |
| I cannot install software on my work laptop. | Use editor-only MCP (manual JSON or dashboard key) — see Install methods → Manual JSON. Or run setup once on a personal machine, copy the API key, paste into work editor config. Terminal CLI on the work machine may be blocked without Docker approval. |
| I have Node for another project — is that enough? | Yes, if node -v shows v22.5 or higher. Below that, use the curl installer — it downloads a private Node 22 instead of failing. |
| Does the AI editor install Node for me? | Sometimes. Cursor/VS Code may bundle npx for MCP stdio configs, but that does not put mcpcli on your system PATH for Mode 2 terminal use. For terminal tools, install Node yourself or use Docker. |
| Docker still needs something installed? | Docker Desktop (or docker CLI) on the host — not Node. The container image includes Node and runs npx zephex for you. |
| How many MB will this download? | curl installer: ~3 MB CLI tarball, plus ~50 MB Node only if you are below 22.5. npm install -g zephex / npx zephex currently also pull unused server libraries (~260 MB, ~2 minutes) until the slim package is published. Docker is a ~50 MB Node image plus that same npm package. |
| What is the best way to download if I have nothing installed? | curl -fsSL https://zephex.dev/cli/install.sh | bash. If you cannot run curl|bash, use editor-only MCP (paste a key into Cursor) or the web terminal. Do not start with npm install -g until the slim package is on npm. |
More: Install methods (all 6) · Connect MCP · CLI in Docker · npx zephex
First time (any OS, Node already installed)
Pick one path — both work the first time you run setup:
Recommended — global install (shortest commands forever):
npm install -g zephex && mcpcli setupOne-shot without global install (pick one):
npx zephex setupnpx -p zephex mcpcli setupPlain mcpcli setup only works after npm install -g zephex (or the combined line above). That is expected — there is no separate npm package named mcpcli on the public registry.
After install — daily commands
mcpcli setupmcpcli get-contextmcpcli usagezepx helpzphx doctorAll of these run the same CLI: mcpcli, zepx, zphx, mcpz, zepcli, zephx, zephex.
Terminal-only vs editor MCP
MCP CLI (Mode 2) runs in your shell — no AI agent required. mcpcli setup when you pick Terminal / CLI only does not change Cursor/VS Code MCP config. Use mcpcli setup --cursor (or another flag) if you also want tools inside the editor.
logout vs disconnect: mcpcli logout removes only ~/.zephex terminal credentials — your editor can keep using MCP. mcpcli disconnect removes Zephex from an editor config and revokes the key — not the same as logout. You can use terminal tools and editor MCP together with one API key; you do not run two separate products.
Who can run it?
Anyone in the world can download and run mcpcli / zephex from npm (public CLI). Your hosted MCP tools at https://zephex.dev/mcp require your API key from setup — strangers cannot use your quota without a key. Keys stay in ~/.zephex (or editor config); nothing secret is baked into the npm package.
More
Connect MCP (editors) · Terminal tools · Full command list · Install & package names · Install methods (no Node / Docker / manual) · CLI in Docker
Project topic commands
These are the commands this CLI is built around. They are not extra MCP tools — they are get_project_context slices (same tool as /overview / /context). In a local project they read disk (tables, pages, auth files, scripts) and print a long card. They need a live API key. They do not spend the hosted ~7-credit context call when the folder is on your machine.
Download, then run
curl -fsSL https://zephex.dev/cli/install.sh | bashsource ~/.zephex/env.shcd your-appzephex login # once — live API keyzephex # type /Full OS notes: install methods · macOS · Linux · Windows. Upgrade later with zephex update.
# in the shell (after zephex)/overview/frontend/auth/database/start # same commands from argvzephex overviewzephex frontendzephex frontend --agentzephex authzephex databasezephex startzephex package express| You type | What a good card says | Not for |
|---|---|---|
/overview | Product story, stack, size, how to run | Table list or file tree |
/frontend | UI stack, ~N files, pages grouped (App / Auth / Billing) | Calling Express the UI |
/auth | Provider, env names, real files (middleware, oauth) | Full request graph — use architecture --focus auth |
/database /data | Provider, folder + file count, migration count, table names | Dumping every .sql file |
/start | Install + real dev / test / build commands | Account login — that is /setup |
--agent prints FACTS / NEXT / GAPS only (short on purpose). /help lists all 10 MCP tools and these slashes. Type /t for test, /p for package, /d for database.
Also: slash reference · argv reference · Mode 2 guide
46 slash commands on bare /
Type / in the REPL to scroll the palette. Full reference: Slash commands. Voice Mode: say scroll down, highlight a row, then run — F8 push-to-talk for push-to-talk.
| Slash | Runs | MCP tool | What it does | Credits |
|---|---|---|---|---|
/overview ★ | overview | — | Best first command — story, stack, run; also: overview https://github.com/owner/repo | 0 |
/deep ★ | deep | — | Orchestrates context + architecture + find; try deep "task", deep github:owner/repo, or --json | 0 |
/dossier | deep | — | Alias for /deep — full project intelligence | 0 |
/install ★ | install | — | Paste github.com/…/blob|tree/… or npmjs.com/package/…. Web: file or zip in Downloads. CLI: writes into this folder; /install --undo removes the last one. Alias: /grab | 0 |
/architecture ★ | architecture | explain_architecture | explain_architecture — wiring map; also: architecture github:owner/repo --focus auth | ~7 |
/context | get-context | get_project_context | get_project_context — one-call brief; also: context https://github.com/owner/repo | ~7 |
/structure | structure | — | Local free inventory: languages, folders, key files, purposes (not architecture) | 0 |
/frontend | frontend | get_project_context | get_project_context topic=frontend — Next/React/pages, never Express as UI | ~7 |
/auth | auth | get_project_context | get_project_context topic=auth — also: auth --agent, auth https://github.com/owner/repo | ~7 |
/database | database | get_project_context | get_project_context topic=database — alias /data | ~7 |
/start | start | get_project_context | get_project_context topic=run — /setup is still login/editor setup | ~7 |
/find ★ | find auth | find_code | find_code — ripgrep; find auth https://github.com/owner/repo (URL is the repo, not the query) | ~5 |
/read ★ | read src/index.ts | read_code | read_code — plain-English file brief; filter /symbol /who /files /scan | ~5 |
/test ★ | check test | check_test | check_test — runs your suite and reports failures; filter /failures /summary /test-fix | ~5 |
/failures ★ | check test failures | check_test | Opens the last run — every failure, broken files, and what to try next (0 credits) | ~5 |
/summary ★ | check test status | check_test | Health dashboard from cached session — coverage and blind spots, no re-run | ~5 |
/test-fix ★ | check test fix-prompt --copy | check_test | When tests fail — copy a fix prompt and paste into your agent | ~5 |
/web ★ | web example.com | — | Live site intel — stack, headers, secrets; filter /site /check-url /shadow | 0 |
/supply ★ | supply https://example.com | — | Wide security scan — filter /supply-site /supply-audit /secrets | 0 |
/ungrab | install --undo | — | Deletes paths recorded in .zephex/grab-last.json after a successful install | 0 |
/safe ★ | safe react | check_package | check_package — CVEs & maintainer risk; filter /upgrade /migrate /compare | ~5 |
/deps ★ | deps | check_package | check_package — every direct dep in package.json; filter /package for one pkg | ~5 |
/package | check-package express | check_package | check_package — one pkg deep-dive; filter /safe /deps /upgrade /migrate | ~5 |
/rupture ★ | rupture app . --live http://localhost:3000 | — | Local kill chains + risks + fixes. Filter /rupture-app /rupture-domain /rupture-prove | 0 |
/doctor ★ | doctor | — | Node, network, API key, editor configs | 0 |
/changes | changes | — | Diff summary — what changed locally | 0 |
/env-check | env-check | — | Required env vars and .env gaps | 0 |
/routes | routes | — | API endpoints and route map | 0 |
/todos | todos | — | FIXME / tech-debt scan | 0 |
/think ★ | think "debug this bug" | keep_thinking | keep_thinking — agent reasoning scaffold; filter /reason /debug-think | ~4 |
/memory ★ | memory list | project_memory | project_memory — list/recall/remember; filter /remember /recall | ~4 |
/ask | ask "where is login" | — | Natural-language router — when you do not know which tool | 0 |
/learn ★ | learn | — | All 10 MCP tools — commands, examples, when to skip; type /learn find_code | 0 |
/btw ★ | ask | — | Quick side question — same as /ask | 0 |
/voice ★ | voice | — | Toggle guidance for ZEPHEX_VOICE + voice-setup / voice-check | 0 |
/usage | usage | — | Tools, key names, credits | 0 |
/help | help | — | All /commands + 10 MCP tools — same tools in Cursor via npx zephex setup | 0 |
/connect | connect | — | npx zephex setup for Cursor / VS Code | 0 |
/cli-guide | cli-guide | — | Mode 2 walkthrough — no AI agent | 0 |
/status | status | — | Editor MCP install sanity check | 0 |
/login | login | — | Browser sign-in or paste API key | 0 |
/clear | clear | — | Clear the terminal | 0 |
/home | welcome | — | Return to welcome / home screen | 0 |
/keys | keys | — | Installed keys & quota | 0 |
/logout | logout | — | Disconnect zephex.dev credentials | 0 |
/quit | quit | — | Leave the shell | 0 |
All 10 MCP tools in the terminal
These call https://zephex.dev/mcp and print answer cards (plain English + Dig deeper). Add --json for the same payload your agent sees. Run npx zephex help terminal for every alias on one screen. Primary names: check-test, check url, remember / recall — not the old editor-only story.
| MCP tool | Primary CLI | Alias count | Example |
|---|---|---|---|
get_project_context | get-context | 50+ | mcpcli frontend |
find_code | find-code | 31 | mcpcli find-code "auth middleware" |
read_code | summarize / outline / symbol | 31 | mcpcli outline src/lib/auth.ts |
explain_architecture | architecture | 6+ | mcpcli architecture --focus auth |
check_test | check-test | 9 | mcpcli check-test "add Stripe webhooks" |
keep_thinking | think | 3 | mcpcli think "debug 401 after refresh" |
check_package | check-package | 13 | mcpcli safe express |
project_memory | remember / recall / memory | 3 slashes | mcpcli remember "auth uses Supabase JWT" |
audit_headers | check url | 6+ | mcpcli check url https://zephex.dev --deep |
Zephex_dev_info | docs | 2 | mcpcli docs "Stripe webhooks" |
CLI-only live scans (no separate MCP slug)
| Command | Purpose |
|---|---|
mcpcli web | Full hosted website scan — stack, headers, tech decode |
mcpcli site | Site Pulse — localhost fast probe or cloud browser scan |
mcpcli supply | Supply Pulse — secrets, outdated JS, CVEs on live URL or GitHub repo |
mcpcli shadow | Shadow API — hidden endpoints and route surface |
Quick reference — account (41 commands)
Setup, disconnect, doctor, help, and cli-guide. Terminal tools are listed above.
FIRST RUN New users start here mcpcli init First-run wizard (browser → zephex.dev login) mcpcli init --terminal Terminal CLI only (no editor) mcpcli login Alias for setup (same OAuth flow) mcpcli logout Terminal sign-out (~/.zephex only) SETUP Connect, switch, fix npx zephex setup Interactive wizard npx zephex setup --cursor Skip the picker npx zephex setup --project Install for current project only npx zephex reconnect Re-run setup (fresh API key) npx zephex reset Clean install (config + skill + rule) CONNECT / DISCONNECT All 22+ editors (same flags for setup) mcpcli connect --cursor Same as setup --cursor mcpcli connect --claude-code Claude Code (alias) mcpcli connect --vscode VS Code mcpcli connect --opencode OpenCode mcpcli connect --codex Codex mcpcli connect --factory-ai Factory Droid mcpcli connect --zed Zed mcpcli reconnect --cursor Fresh key + re-setup mcpcli reconnect --claude-code Works for all editor aliases MANAGEMENT Once you're connected mcpcli disconnect --cursor Remove from one editor + revoke key mcpcli disconnect --claude-code Alias for --claude mcpcli disconnect --all Remove from every editor mcpcli logout --all Terminal + disconnect all editors npx zephex tools List the 10 MCP tools npx zephex tools --enable a,b Restrict tools (min 2, max 9) npx zephex tools --reset Re-enable all tools npx zephex skills Install skill + rule files npx zephex skills --upgrade Refresh skill files to latest npx zephex skills --remove Remove skill + rule files INSPECTION What's installed, what's broken npx zephex list Show every editor's install status npx zephex status Live check the proxy with your key npx zephex keys Show installed keys (masked) npx zephex usage Per-tool call counts npx zephex doctor 6 diagnostic checks npx zephex repair Fix broken stdio pins in editor configs npx zephex info Version, install path, update check META mcpcli update Check npm for newer version mcpcli update --apply npm install -g zephex@latest npx zephex help Full help with examples npx zephex --version Same as infosetup — Connect an editor
The wizard does everything: opens the browser, signs you in, creates an API key, writes the config file, and optionally installs the skill + rule files.
Three steps in one flow
Step 1 → Pick editor (20 options, hotkeys 1-9 / 0 / a-j)Step 2 → Pick scope (only shown if you're in a real project) ┌── All projects (global) — works everywhere └── This project only — config stays in this folderStep 3 → Pick mode ┌── MCP + Skill + Rule (default) — agent uses tools proactively └── MCP only — tools available, agent decides Then → Browser opens → Sign in → API key created → Config written → DoneCommon variations
# Full wizardnpx zephex setup # Skip the picker — directly connect Cursornpx zephex setup --cursor # Skip both picker and scope prompt — Cursor, this project onlynpx zephex setup --cursor --project # Skip everything — Cursor, this project, with skill + rulenpx zephex setup --cursor --project --with-skill # Connect multiple editors at oncenpx zephex setup --cursornpx zephex setup --claudenpx zephex setup --vscode # Use a key you already have (skip OAuth)ZEPHEX_API_KEY=mcp_prod_... npx zephex setup --cursordisconnect — Remove from an editor
Removes the Zephex entry from an editor's MCP config file and revokes the API key on the server.
# Interactive pickernpx zephex disconnect # Specific editornpx zephex disconnect --cursornpx zephex disconnect --claudenpx zephex disconnect --vscode # Every editor at once (also revokes every key)npx zephex disconnect --all # Disconnect AND remove the skill/rule filesnpx zephex disconnect --cursor --with-skillreset — Full cleanup
Like disconnect but also removes the skill and rule files. Use when you want a totally fresh slate.
# Reset one editornpx zephex reset --cursor # Nuclear option — every editor + every skill/rule filenpx zephex reset --allstatus — Live connection check
For each editor that has Zephex installed, hits the proxy with the actual API key and reports PASS/FAIL.
$ npx zephex status EDITOR CONFIG KEY STATUS TOOLS DETAIL------------------ ---------------------------------- --------------- ------ ----- ------Cursor (global) ~/.cursor/mcp.json mcp_prod_pri... PASS 10 okClaude Code ~/.claude.json mcp_prod_pri... PASS 10 okVS Code (project) ./.vscode/mcp.json mcp_prod_ver... PASS 10 okCodex (global) ~/.codex/config.toml mcp_prod_pri... PASS 10 okIf STATUS shows FAIL, run npx zephex doctor for diagnostics.
list — Offline install map
Shows every editor and whether it has Zephex installed. Doesn't hit the network.
$ npx zephex list Zephex install status cwd: /Users/you EDITOR STATUS CONFIG ───────────────────────────────────────────── Cursor ● global ~/.cursor/mcp.json Claude Code ● connected ~/.claude.json (+ project) VS Code ● project ./.vscode/mcp.json Codex ● global ~/.codex/config.toml OpenCode ○ not installed — Windsurf ○ not installed — Zed ○ not installed — ... 4 of 20 editors connected. Run npx zephex status to verify the API key works.The connected status means both global AND project configs exist. global means only home directory; project means only the current folder.
tools — Filter which tools your agent sees
By default all 10 MCP tools are exposed to your AI agent. You can restrict that to any subset of 2-9 tools.
List all tools
$ npx zephex tools ● find_code code BM25 code search ● read_code code AST-based reader ● check_test code Plain English → focus files ● get_project_context code Project snapshot ● explain_architecture code Mermaid + dependency analysis ● keep_thinking reasoning Persistent reasoning state ● audit_headers web HTTP / TLS audit ● check_package web Package safety check ● project_memory memory Remember and recall project decisions, gotchas, and conventions across sessions via local SQLite ● Zephex_dev_info knowledge Expert dev knowledge baseRestrict to specific tools
# Just 2 tools (the minimum)npx zephex tools --enable find_code,read_code # Just 3 toolsnpx zephex tools --enable find_code,read_code,check_test # All 5 code toolsnpx zephex tools --enable find_code,read_code,check_test,get_project_context,explain_architecture # 4 tools — code reading + reasoningnpx zephex tools --enable find_code,read_code,check_test,keep_thinking # Re-enable all 10npx zephex tools --resetThe filter is saved to ~/.zephex/config.json. Restart your editor for changes to take effect.
For the full filtering guide with use cases see Tool Filtering.
keys — Show installed API keys
Lists every Zephex API key you have installed across all editors. Keys are masked for safety — only the first 12 and last 4 chars are shown.
$ npx zephex keys Zephex API keys Keys installed in your editor configs (masked for safety) 1. mcp_prod_pri…4f32 (pro) Editors: Cursor (global), Claude Code (global), VS Code (project) Usage: 142/3500 this month (4%) 2. mcp_prod_ver…9a01 (free) Editors: Codex (global) Usage: 47/555 this month (8%) 2 unique keys across 4 editor configs.If multiple editors share one key (because you signed in once and connected several editors), they'll be grouped together. Each unique OAuth login creates one key.
usage — Per-tool call counts
Shows how many times each tool has been called this month, with a bar chart.
$ npx zephex usage Zephex tool usage How often each tool has been called by your installed keys mcp_prod_pri…4f32 (pro) Used by: Cursor (global), Claude Code (global) Today 17 calls This month 423 / 3500 ████░░░░░░░░░░░░░░░░ 12% By tool (this month): find_code 142 ███████████████ read_code 89 █████████░░░░░░ check_test 67 ███████░░░░░░░░ keep_thinking 51 █████░░░░░░░░░░ explain_architecture 28 ███░░░░░░░░░░░░ audit_headers 16 ██░░░░░░░░░░░░░ check_package 15 ██░░░░░░░░░░░░░ project_memory 9 █░░░░░░░░░░░░░░ get_project_context 4 ░░░░░░░░░░░░░░░ Zephex_dev_info 2 ░░░░░░░░░░░░░░░If your editor was just connected, give it a few minutes — first calls take time to register. For live numbers see the dashboard.
doctor — Diagnose problems
Runs 6 checks to find common issues.
$ npx zephex doctor zephex doctor Diagnostic checks for Zephex setup ✓ Node.js version Node.js 22.10.0 ✓ Platform darwin arm64 (24.5.0) ✓ Proxy environment No proxy configured ✓ Network access Reached https://zephex.dev/api/health ✓ MCP endpoint https://zephex.dev/mcp responding (401 expected without key) ✓ Installed editors Found Zephex in 4 editor config(s) All checks passed. You're good to go.If any check fails, the doctor shows a fix:
✗ Network access Network error: getaddrinfo ENOTFOUND → Check your internet connection or HTTPS_PROXY env var ✗ Node.js version Node.js 18.0.0 is too old (requires 20+) → Upgrade Node.js: https://nodejs.org/info — Package info + update check
Shows the installed version, install path, platform, and checks the npm registry for newer versions.
$ npx zephex info Zephex CLI MCP tools for AI coding agents Installed 2.2.0 Website https://zephex.dev Dashboard https://zephex.dev/dashboard Support support@zephex.dev Runtime Install type global (npm install -g) Install path /usr/local/bin/zephex Node v22.10.0 Platform darwin arm64 Update ● Newer version available: 2.3.0 (you have 2.2.0) npm install -g zephex@latest npx zephex@latest setupskills — Manage skill + rule files
The skill file teaches your AI agent when to call Zephex tools. The rule file sets conventions. Without them, tools are available but the agent may not use them proactively.
# Install skill + rule for an editornpx zephex skills --cursor # Install for any editor (interactive picker)npx zephex skills # Refresh existing skill + rule files to the latest versionnpx zephex skills --upgrade # Remove all skill + rule filesnpx zephex skills --removeSkill files are written to editor-specific paths. For Cursor that's ~/.cursor/skills/find-code/SKILL.md and ~/.cursor/rules/zephex.mdc. For Claude Code that's ~/.claude/skills/find-code/SKILL.md and ~/.claude/rules/zephex.md. OpenCode uses ~/.config/opencode/skills/find-code/SKILL.md.
Flag reference
Editor flags (skip the picker)
--cursor Cursor IDE--claude Claude Code (CLI)--vscode VS Code (with Copilot/Cline)--codex Codex (OpenAI)--opencode OpenCode CLI--windsurf Windsurf IDE--zed Zed editor--warp Warp terminal agent--gemini Gemini CLI--kiro Kiro (AWS)--cline Cline (VS Code extension)--jetbrains JetBrains IDEs--kilo Kilo Code (Roo successor)--amp Amp (Sourcegraph)--continue Continue (VS Code + JetBrains plugin)--copilot GitHub Copilot CLI--droid Factory Droid--claude-desktop Claude Desktop app--antigravity Google Antigravity IDE--trae TRAE (ByteDance)Behavior flags
--all Apply to all editors (disconnect/reset)--with-skill Also install skill + rule after setup--project Install config in current project only--global Install config globally (default outside projects)--upgrade Refresh skill + rule files to latest version--remove Remove skill + rule files--reset Re-enable all tools (with tools command)--enable a,b,c Restrict to specific tools (with tools command)--debug Verbose output for troubleshooting--help, -h Show help--version, -v Same as infoEnvironment variables
ZEPHEX_API_KEY Override the API key (skip OAuth flow)AUTH0_CLI_CLIENT_ID Override the Auth0 client (advanced)DEBUG Set to any value for verbose loggingNO_COLOR Set to disable colored outputHTTPS_PROXY HTTP proxy URL (for corporate networks)Exit codes
0 Success1 Configuration error or user cancellation2 Network or auth error3 Editor config write failedTerminal tools (Mode 2)
After setup, run hosted tools directly in the shell — same API as your editor, formatted for humans. Full guide: Terminal CLI guide.
npx zephex learn # per-tool guide (no API call)npx zephex learn find_codenpx zephex find-code tools # discovery after any tool namenpx zephex cli-guide # interactive topicsnpx zephex get-contextnpx zephex find-code "auth"npx zephex summarize src/page.tsxnpx zephex architecturenpx zephex depsnpx zephex compare lodash ramdanpx zephex ask "where is login"npx zephex historynpx zephex help terminal # all aliasesPower mode
| Command | Example | Purpose |
|---|---|---|
deps | mcpcli deps | Project dependency health scan |
compare | mcpcli compare lodash ramda | Compare two packages |
history | mcpcli history 3 | Re-run recent local commands |
ask | mcpcli ask "where is login" | Route plain English to the right tool |
Command Compass: unknown input shows copy-paste fixes — full guide.
Tool discovery (no API call)
| Command | Output |
|---|---|
mcpcli | Interactive palette (TTY): context, find, deps, ask, learn |
mcpcli learn | Index of core tools with copy-paste commands |
mcpcli commands | Alias for learn — terminal tool index (not editor tools toggle) |
mcpcli learn find_code | One tool: purpose, aliases, examples, when to skip |
mcpcli find-code tools | Learn screen — discovery terms: tools, help, com, commands |
mcpcli get-context help | Same learn screen (no API call) |
mcpcli get-contect | Typo → auto-routes to get-context |
mcpcli compass learbn | Command Compass — copy-paste fixes for typos and questions |
Local by default: find/read/architecture index the folder you are in (not git remote unless you pass --no-local or --path github:owner/repo). Monorepos auto-pick the richest package (e.g. mcp-proxy/ from repo root).
Where to next
- Command Compass — typos, questions, TTY pick-and-run
- Terminal CLI (Mode 2) — find-code, monorepos, flags
- Setup Walkthrough — visual end-to-end install diagram
- Tool Filtering — enable/disable specific tools with examples
- Quickstart — manual config (no Node.js)
- Supported Editors — config path for each of 20 editors
- Troubleshooting — common errors and fixes