CLI
Terminal tools (Mode 2)
Same hosted MCP as your editor — answers in plain English in the shell. All 10 MCP tools have terminal commands; 10 tools total. Local folder by default; answer cards, not chat dumps.
Tip: Run mcpcli setup or mcpcli init once — it saves ~/.zephex/credentials.json so terminal tools work even before you connect an editor. Then cd into a project and run mcpcli overview.
Both hit https://zephex.dev/mcp with the same API key. CLI returns human-readable output you can pipe or paste; MCP tools run inside your editor agent loop.
| Scenario | Terminal CLI | Editor MCP tool | Pick |
|---|---|---|---|
| You want a project brief before coding | mcpcli get-context | Ask agent: get_project_context | Either — CLI for copy-paste; MCP when agent is already in chat |
| Search repo for a symbol or string | mcpcli find-code "auth" | Ask agent: find_code | CLI for quick grep; MCP when agent should act on results |
| Outline a file before editing | mcpcli outline src/auth.ts | Ask agent: read_code | CLI — human-readable, no agent loop |
| Check if an npm package is safe | mcpcli safe express | Ask agent: check_package | Either — no project folder required |
| Audit live HTTP headers / TLS | mcpcli check url https://localhost:3000 --deep | audit_headers | CLI or MCP — needs a reachable URL (dev server or production) |
| Multi-turn investigation session | mcpcli think "debug 401" (one-shot) | keep_thinking with sessionId | MCP for persistent sessions; CLI for quick reasoning |
| Connect a new editor | mcpcli setup --cursor | N/A — setup is CLI-only | CLI |
| Diagnose broken MCP connection | mcpcli doctor · mcpcli repair · mcpcli list | Ask agent: tools/list | CLI — doctor checks Node, network, and config files |
Common mistake: Running terminal tools from ~ or /tmp — Zephex needs a project folder with package.json + source files. cd into your app first, or use --cwd apps/web in monorepos.
Zephex CLI is a terminal product that talks to the same hosted intelligence as your editor MCP — but answers in plain English for humans. You install once, sign in once, then run short commands from any project folder: stack brief, find a symbol, outline a file, check if a package is safe, run tests, or audit a live URL. No agent loop required.
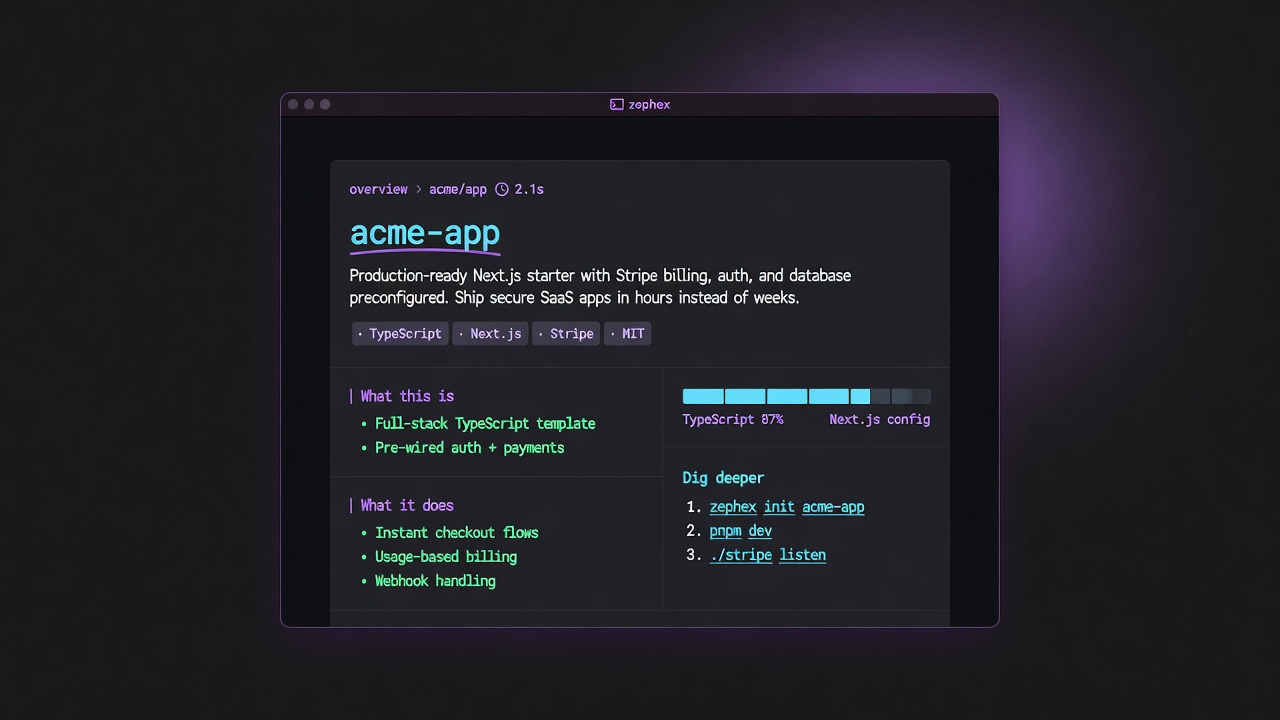
What a good Mode 2 reply looks like: short hero, plain English, · tags, │ sections, numbered Dig deeper — not a wall of chat.
The craft: answer cards, not chat dumps
Mode 2 is designed like a senior engineer sitting next to you — not like a chat model monologue. Each successful tool prints a structured answer card:
Hero first
Project name, package name, or search query in high contrast — so you know what you’re looking at in half a second.
Plain English story
Two to four sentences on what it is and how you’d use it. Badges and marketing noise are stripped before display.
· tags + │ rails
Stack, license, and scale as a quiet tag strip. Sections use a left rail so your eye can scan What this is / What it does / Getting started.
Dig deeper
Numbered next commands (architecture, find-code, setup…) so you never dead-end after one answer.
Honesty
If a section has no real data, it is dropped — Zephex does not invent stack or print “none detected” filler.
Human ≠ agent
Default output is the card. Pass --json when you want the same lean payload your editor agent sees.
| Who | When | Try |
|---|---|---|
| Solo builders | Before opening the editor — orient on a new clone in under a minute. | mcpcli overview |
| Teams onboarding | Hand a new hire five commands instead of a 40-page wiki. | mcpcli get-context · mcpcli architecture |
| Security-minded deploys | Before npm install, or after shipping a public URL. | mcpcli safe express · mcpcli check url https://your.app |
| Monorepo maintainers | Point tools at one package without losing the root workspace. | mcpcli find-code "auth" --cwd apps/web |
| CI / scripts | Pipe machine-readable results into bots or logs. | mcpcli get-context --json · mcpcli deps --json |
| Editor users who also live in the shell | Same API key as Cursor / Claude — terminal for speed, MCP for multi-step agent work. | mcpcli setup --cursor then mcpcli find-code "…" |
# 1) Install (no Node required)curl -fsSL https://zephex.dev/cli/install.sh | bashsource ~/.zephex/env.sh# Windows: irm https://zephex.dev/install.ps1 | iex # 2) Sign in (browser → saves ~/.zephex/credentials.json)zephex init --terminal# or: zephex login # 3) Stand in a real project (package.json + source)cd ~/projects/my-app # 4) First answers — plain English cardsmcpcli overviewmcpcli get-contextmcpcli find-code "auth"mcpcli safe expressmcpcli check-test # 5) Optional: wire an editor toomcpcli connect --cursor # 6) Healthmcpcli doctormcpcli usageLearn these ten first. Everything else is aliases, Power Mode, or Pulse product lines.
| Command | What you get |
|---|---|
overview | Product story + stack bars + how to run |
get-context | Structured project brief (topics: auth, database, …) |
find-code | Search symbols, strings, renames |
summarize | Plain-English file read (read_code) |
check-test | Run tests + failures / why |
safe | Is this npm package safe to install? |
architecture | How the app is wired |
check url | Live URL header / TLS audit |
remember | Save a project fact for later sessions |
connect | Wire Cursor / VS Code / Claude / 22+ editors |
New repo clone — “what is this?”
- cd into the app (or apps/web in a monorepo)
- mcpcli overview — product story, size, how to run
- mcpcli get-context — stack, scripts, env names
- mcpcli architecture — how modules wire together
cd my-appmcpcli overviewmcpcli get-contextmcpcli architecture --focus authFind a symbol, then read it
- mcpcli find-code "validateToken" — ranked hits
- mcpcli symbol validateToken — AST body
- mcpcli summarize src/lib/auth.ts — plain-English file brief
mcpcli find-code "validateToken"mcpcli symbol validateTokenmcpcli summarize src/lib/auth.tsBefore you npm install
- mcpcli safe <pkg> — CVEs + registry risk (no project required)
- mcpcli check-package next --task upgrade --from-version 14.2.0
- mcpcli deps — scan every direct dependency in package.json
mcpcli safe lodashmcpcli check-package next --task upgrade --from-version 14.2.0mcpcli depsBefore you ship
- mcpcli check-test — run suite + failure clusters
- mcpcli check url https://staging.example.com — headers, TLS, secrets surface
- mcpcli supply https://staging.example.com — Supply Pulse on the live site
mcpcli check-testmcpcli check url https://staging.example.commcpcli supply https://staging.example.comRemember decisions across sessions
- mcpcli remember "auth uses Supabase JWT in cookies"
- mcpcli recall auth — search saved facts
- mcpcli memory list — recent titles
mcpcli remember "rate limit is Upstash sliding window per API key"mcpcli recall rate limitmcpcli memory listSTEP 1
You type a short command (or plain English)
Intent routing maps typos and phrases to the right tool — no LLM in the loop for routing. Example: mcpcli "tell me about my project" → get-context.
STEP 2
Local project is indexed from your disk
By default Zephex uploads manifests + a bounded file set (inline_files) from your current folder — private repos work without a public GitHub URL.
STEP 3
Hosted tools analyze at zephex.dev/mcp
Same API key as editor MCP. Usage counts toward your plan. Failures on empty folders fail fast so you do not burn quota from ~.
STEP 4
Terminal renders an answer card
Hero, plain English, tags, sections, Dig deeper. --json skips the card and prints the agent payload.
On a TTY, bare mcpcli opens a shell. Type / for the palette — Tab fills, Enter runs.
mcpcli # bare + TTY → interactive shell, type //overview # slash palette (Tab to fill, Enter to run)/find auth/safe express/login # if not signed inmcpcli help terminal # full Mode 2 alias listmcpcli learn find_code # per-tool guide, no API call| Mistake | Fix |
|---|---|
| Running from ~ or /tmp | cd into a folder with package.json (or pyproject.toml / go.mod) first. |
| Expecting full monorepo search from the root always | Use mcpcli … --cwd packages/api or cd into the package you care about. |
| Confusing remember with package upgrade | remember/recall = project_memory facts. Package upgrades = mcpcli check-package --task upgrade (legacy: loop-guard). |
| Assuming multi-turn think works like the editor | Terminal mcpcli think is one-shot. Full keep_thinking sessions with sessionId are editor MCP. |
| Using an old global binary | mcpcli update --apply or re-run curl -fsSL https://zephex.dev/cli/install.sh | bash — then mcpcli doctor. |
No AI agent in the loop. Your shell runs npx zephex; the CLI uploads a search index from disk (inline_files) and calls the same hosted endpoint as your editor.
No Node? curl -fsSL https://zephex.dev/cli/install.sh | bash. npx/npm need Node.js 22.5+. Check with node -v. Still stuck? start from zero (MB + steps) · 6 install methods
curl installer — terminal CLI (Mode 2)
This one-liner is the Mode 2 terminal installer — the same zephex shell you type / in. It is not the editor MCP wizard on the homepage (npx -p zephex mcpcli setup). Same account and API key later; different first command.
curl -fsSL https://zephex.dev/cli/install.sh | bashSame script lives at both URLs (use either):
curl -fsSL https://zephex.dev/cli/install.sh | bash# aliascurl -fsSL https://zephex.dev/install.sh | bashWhat it does
- Installs into
~/.zephex(or%USERPROFILE%\.zephexon Windows) — not into your project. - If your system Node is missing or older than 22.5, it downloads a private Node 22 runtime (~50 MB compressed, once) under
~/.zephex/node. - Downloads the
zephexnpm tarball only (~3 MB today, ~13 MB unpacked) into~/.zephex/npm-globaland linkszephex+mcpcli. It does not runnpm install -g— that would also pull unused server libraries (~260 MB). - Starts
zephex init --terminalso you can sign in in the browser. It does not write Cursor / Claude / VS Code MCP config. Editor wiring iszephex connect --cursor(ornpx -y zephex@latest setup --cursor).
By operating system
macOS (Intel or Apple Silicon) — Terminal or iTerm. Needs curl (already there). After install, new Terminal windows pick up PATH from ~/.zshrc and ~/.zprofile. The current window still needs:
source ~/.zephex/env.shLinux (x64 or arm64) — bash, zsh, or fish. Same curl line. PATH is appended to ~/.bashrc / ~/.profile (and fish config if needed). If you installed as one user and launch the desktop as another, the binary will not be on PATH — stay on the same account.
Windows — do not pipe the bash installer in cmd.exe. Use PowerShell:
irm https://zephex.dev/install.ps1 | iexWSL or Git Bash: use the macOS/Linux curl line inside that Linux environment. Mixing C:\Users\…\.zephex with /home/you/.zephex is the usual break.
Cloud shells, phones, other OS
- Google Cloud Shell, GitHub Codespaces, Railway / Render shells — use the same curl line. Those boxes often ship Node 18 or 20. The installer notices and downloads a private Node 22 under
~/.zephex/nodeinstead of failing. Do not usenpx zephex setupthere unlessnode -vis already 22.5+. - Android (Termux) — curl + bash work. Same installer. Hosted commands still need HTTPS out to zephex.dev.
- iPhone / iPad — there is no native
zephexbinary. Use the web terminal in Safari, or SSH into a Mac/Linux box that already has the CLI. - Windows ARM (Surface, Snapdragon) — PowerShell installer downloads the
win-arm64Node build. WSL on ARM uses the Linux arm64 curl line.
What the CLI talks to
- Install download — Vercel serves
install.sh/install.ps1. The CLI itself comes from the npm registry, not from Railway. - Sign-in — browser or QR hits
zephex.dev/cli/auth(Vercel). Youruser_idand key name are written to Supabase. The API key is stored only in~/.zephex/credentials.json(mode 0600). - Tool commands (
/overview,/architecture, …) go to the hosted MCP proxy on Railway (https://zephex.dev/mcpis the public URL). Credits and tool names are stored peruser_idinusage_events. - Sentry — Railway captures hosted tool / API errors (tagged with CLI version). The local
zephexprocess does not send your repo to Sentry.
After install — first commands
source ~/.zephex/env.shcd your-appzephex# type /overview or /helpHosted tools need a live API key (dashboard keys or the browser sign-in the installer opens). /help and /learn work without a key. /frontend /auth /database /overview do not.
Upgrade
The curl script always installs npm zephex@latest (unless you pin ZEPHEX_VERSION). Re-run it, or:
zephex update # or re-run the installer (installs npm zephex@latest into ~/.zephex)curl -fsSL https://zephex.dev/cli/install.sh | bash # pin a versionZEPHEX_VERSION=2.5.13 curl -fsSL https://zephex.dev/cli/install.sh | bashCheck what you have: zephex info or zephex --version. If which zephex points at an old global npm (not ~/.zephex/bin/zephex), source ~/.zephex/env.sh or reopen the terminal.
This vs the homepage npx line
curl -fsSL https://zephex.dev/cli/install.sh | bash— install the terminal (Mode 2). No Node required on the machine first.npx -p zephex mcpcli setup— editor MCP wizard (Mode 1). Needs Node already. Writes Cursor / Claude config.- You can use both with one API key. Install the CLI first, then
zephex connect --cursorwhen you want the editor.
Uninstall
zephex uninstall # PATH + credentialszephex uninstall --full # delete entire ~/.zephexIf something looks stuck
command not found: zephex—source ~/.zephex/env.sh, then open a new tab.- Piped curl into bash: the installer cannot keep PATH in that parent shell. That is why it prints the
sourceline. - Only run the script from
zephex.dev— never a random gist. - Offline or corporate TLS intercept: the script needs HTTPS to zephex.dev (npm package) and, if Node is missing, nodejs.org.
More paths: all install methods · macOS · Linux · Windows · terminal CLI
mcpcli is the short install name for the Zephex MCP CLI (npm package zephex). Same binary, same API key, same 10 tools — you can type mcpcli instead of zephex after a one-time install. Official package name on npm remains zephex; command aliases ship inside that package (v2.4.6+).
Node.js required (or alternatives)
Includes best download path and how many MB each option uses — see download sizes.
mcpcli, npx zephex, and npm install -g zephex are Node.js programs. They need Node.js 22+ and npm on your PATH (or Node inside Docker). Zephex in the browser or in an editor over HTTPS does not replace that for terminal Mode 2.
Quick answer: Most people should install Node.js LTS, restart the terminal, then run npm install -g zephex && mcpcli setup. Pick another row in the table only if Node or global install is not possible on your machine.
Recommended if you have nothing installed yet: official Node.js LTS from nodejs.org or skip Node entirely with the curl installer (~3 MB CLI tarball). npm install -g zephex currently unpacks ~260 MB of unused deps — prefer curl.
# Best download — no Node required (~3 MB CLI; +~50 MB Node only if missing)curl -fsSL https://zephex.dev/cli/install.sh | bash # Already have Node 22.5+ and want editor MCP only:npx -y zephex@latest setup --cursor # Avoid until slim publish: npm install -g zephex / bare npx zephex# Those currently also install unused server libraries (~260 MB).| What you download | Approx. download | After install on disk |
|---|---|---|
| Node.js LTS (Windows .msi) — best base for most users | ~30 MB | ~100–250 MB |
| Node.js LTS (macOS .pkg) | ~84 MB | ~100–250 MB |
zephex CLI only (npm install -g zephex) | ~3 MB | ~260 MB in npm cache |
| npx zephex setup (no global install) | Same ~3 MB CLI on first run | Cached under ~/.npm; no separate “Zephex app” installer |
Docker node:22-alpine (no local Node) | ~45–60 MB image pull | Docker Desktop ~500+; image ~45–60 MB |
| Editor-only MCP (HTTPS + API key) | 0 MB CLI — config only | No Node required on laptop |
Sizes vary slightly by Node version and OS. You are not downloading a large IDE or a multi-GB SDK — just Node (if needed) and a small npm package. Tools run against https://zephex.dev/mcp; your project code is not uploaded as a full repo by default.
Step 1 — check what you already have:
node -vnpm -vwhich nodewhich npmv18.x,v20.x, orv22.x→ you are ready; skip to after Node is installed.command not found→ Node is missing; install below or use Docker / editor-only.v16or lower → upgrade Node; the CLI requires 22+.
Step 2 — pick the best path for you:
| Your situation | Best option | Notes |
|---|---|---|
| New user, can install software | Node.js LTS + npm install -g zephex && mcpcli setup | Recommended. Shortest commands: mcpcli, zepx, zephex. |
| Have Node, try before installing globally | npx zephex setup | ~5s first download; nothing permanent except credentials. |
| Use Bun instead of Node day-to-day | bun install -g zephex | Still a JS runtime; see Bun block below. |
| Use pnpm | pnpm add -g zephex | Same CLI; see pnpm block below. |
| No Node on host; Docker allowed | Docker + npx in container | Mount $HOME so credentials survive. |
| No Node, no Docker; only Cursor / Claude | Editor MCP (HTTP) | Mode 1 in editor — not the same as terminal mcpcli tools. |
| Corporate laptop, no installs | Manual JSON config | Paste MCP config + API key; setup wizard optional on another machine. |
| Only need terminal tools occasionally | npx zephex … per command | Needs Node each time; no global PATH entry. |
Download the LTS installer if you are unsure — it includes npm. After install, close and reopen your terminal (required on Windows so PATH updates).
# macOS — recommended for most users# Option A: Homebrew (developers)brew install node # Option B: Official LTS installer (everyone)# Download from https://nodejs.org/en/download# Run the .pkg, then restart Terminal # Option C: Version manager (multiple Node versions)# fnm: https://github.com/Schniz/fnm# nvm: https://github.com/nvm-sh/nvm# Windows — recommended for most users# Option A: winget (Windows 10/11)winget install OpenJS.NodeJS.LTS # Option B: Official LTS installer# https://nodejs.org/en/download — check "Add to PATH" during install# Then open a NEW Command Prompt or PowerShell window # Verify (new window):node -vnpm -v# Linux — pick one# Option A: NodeSource (Debian/Ubuntu)curl -fsSL https://deb.nodesource.com/setup_22.x | sudo -E bash -sudo apt-get install -y nodejs # Option B: Distro packages (may be older — need v18+)# sudo apt install nodejs npm # only if version >= 18 # Option C: nvm (no sudo, per-user)# curl -o- https://raw.githubusercontent.com/nvm-sh/nvm/v0.40.1/install.sh | bash# nvm install --lts# nvm use --ltsStep 3 — after Node works, run Zephex setup:
npm install -g zephex && mcpcli setupWithout global install (still needs Node + npm for npx):
npx zephex setupnpx -p zephex mcpcli setupThese still require a JavaScript runtime on the machine — not a substitute for “no Node at all.”
bun install -g zephexmcpcli setup# or one-shot:bunx zephex setuppnpm add -g zephexmcpcli setup# or one-shot:pnpm dlx zephex mcpcli setupNo Node on this computer? Use Docker (Node runs inside the image) or editor-only MCP. Docker still requires Docker Desktop / Engine on the host.
# Docker Desktop or Engine required on the hostdocker pull node:22-alpine # Setup (writes ~/.zephex + editor configs on YOUR machine)docker run -it --rm \ -v "$HOME:/root" \ -w /root \ node:22-alpine \ npx -y zephex setup # Terminal tool in your repo (mount project folder)cd /path/to/your-appdocker run -it --rm \ -v "$HOME:/root" \ -v "$(pwd):/work" \ -w /work \ node:22-alpine \ npx -y zephex get-contextOptional alias so daily commands look like local mcpcli:
# ~/.bashrc or ~/.zshrc — shorter daily commandsalias mcpcli='docker run -it --rm -v "$HOME:/root" -w "$(pwd):/work" -w /work node:22-alpine npx -y zephex' mcpcli setupmcpcli get-contextFull CLI in Docker guide · Windows paths: use %USERPROFILE% instead of $HOME in -v mounts.
If you only want MCP tools inside Cursor or Claude Code and never run commands in Terminal, you can connect over HTTPS without installing Node on your laptop. Terminal Mode 2 (mcpcli get-context, etc.) still needs Node or Docker somewhere.
# No local Node needed for Cursor / Claude Code (hosted HTTP)# 1. Create a key: https://zephex.dev/dashboard/api-keys# 2. In Cursor: Settings → MCP → add server URL:# https://zephex.dev/mcp# Header: Authorization: Bearer YOUR_API_KEY# Or run setup on ANY machine that has Node once, copy the key into the editor. # Full wizard (needs Node somewhere once):# mcpcli setup --cursor# "command not found: node" or "command not found: npx"# → Node is not installed OR not on your PATH.# Fix: install LTS from nodejs.org, restart terminal, run node -v again. # "mcpcli: command not found" after npm install -g# → Global npm bin not on PATH, or install did not finish.# Fix: npm install -g zephex# npm bin -g # add this folder to PATH# Or skip global: npx zephex setup # EACCEs / permission denied on npm install -g (macOS/Linux)# Fix: mkdir -p ~/.npm-global && npm config set prefix ~/.npm-global# Add to ~/.zshrc: export PATH="$HOME/.npm-global/bin:$PATH" # Old Node (v16 or below)# Fix: upgrade to Node 22.5+ — or use curl install.sh, which bundles Node.| Question | Answer |
|---|---|
| Do I need Node.js to use Zephex at all? | Not for the curl installer — it bundles Node 22 under ~/.zephex if needed. npx / npm / bun still need Node 22.5+ on PATH. Editor MCP over HTTPS can work with only an API key. |
| What is the best install for a new user? | curl -fsSL https://zephex.dev/cli/install.sh | bash — then source ~/.zephex/env.sh. That works with or without Node. Use npx zephex setup --cursor only when you already have Node 22.5+ and want editor MCP. |
| I cannot install software on my work laptop. | Use editor-only MCP (manual JSON or dashboard key) — see Install methods → Manual JSON. Or run setup once on a personal machine, copy the API key, paste into work editor config. Terminal CLI on the work machine may be blocked without Docker approval. |
| I have Node for another project — is that enough? | Yes, if node -v shows v22.5 or higher. Below that, use the curl installer — it downloads a private Node 22 instead of failing. |
| Does the AI editor install Node for me? | Sometimes. Cursor/VS Code may bundle npx for MCP stdio configs, but that does not put mcpcli on your system PATH for Mode 2 terminal use. For terminal tools, install Node yourself or use Docker. |
| Docker still needs something installed? | Docker Desktop (or docker CLI) on the host — not Node. The container image includes Node and runs npx zephex for you. |
| How many MB will this download? | curl installer: ~3 MB CLI tarball, plus ~50 MB Node only if you are below 22.5. npm install -g zephex / npx zephex currently also pull unused server libraries (~260 MB, ~2 minutes) until the slim package is published. Docker is a ~50 MB Node image plus that same npm package. |
| What is the best way to download if I have nothing installed? | curl -fsSL https://zephex.dev/cli/install.sh | bash. If you cannot run curl|bash, use editor-only MCP (paste a key into Cursor) or the web terminal. Do not start with npm install -g until the slim package is on npm. |
More: Install methods (all 6) · Connect MCP · CLI in Docker · npx zephex
First time (any OS, Node already installed)
Pick one path — both work the first time you run setup:
Recommended — global install (shortest commands forever):
npm install -g zephex && mcpcli setupOne-shot without global install (pick one):
npx zephex setupnpx -p zephex mcpcli setupPlain mcpcli setup only works after npm install -g zephex (or the combined line above). That is expected — there is no separate npm package named mcpcli on the public registry.
After install — daily commands
mcpcli setupmcpcli get-contextmcpcli usagezepx helpzphx doctorAll of these run the same CLI: mcpcli, zepx, zphx, mcpz, zepcli, zephx, zephex.
Terminal-only vs editor MCP
MCP CLI (Mode 2) runs in your shell — no AI agent required. mcpcli setup when you pick Terminal / CLI only does not change Cursor/VS Code MCP config. Use mcpcli setup --cursor (or another flag) if you also want tools inside the editor.
logout vs disconnect: mcpcli logout removes only ~/.zephex terminal credentials — your editor can keep using MCP. mcpcli disconnect removes Zephex from an editor config and revokes the key — not the same as logout. You can use terminal tools and editor MCP together with one API key; you do not run two separate products.
Who can run it?
Anyone in the world can download and run mcpcli / zephex from npm (public CLI). Your hosted MCP tools at https://zephex.dev/mcp require your API key from setup — strangers cannot use your quota without a key. Keys stay in ~/.zephex (or editor config); nothing secret is baked into the npm package.
More
Connect MCP (editors) · Terminal tools · Full command list · Install & package names · Install methods (no Node / Docker / manual) · CLI in Docker
npm install -g zephex && mcpcli setupcd your-appmcpcli overviewmcpcli get-contextmcpcli find-code "auth middleware"mcpcli summarize src/index.tsmcpcli architecturemcpcli check-testmcpcli safe expressYou should see an answer card (hero name, · tags, │ sections) and often Using local project (N files from …) — not a bare git remote URL. If tools fail with Using Git remote, update: npm install -g zephex@latest.
npx zephex cli-guidenpx zephex cli-guide quickstartnpx zephex cli-guide monoreponpx zephex help terminalUnknown subcommand? See Command Compass.
npx zephex learnnpx zephex learn find_codenpx zephex find-code toolsOption A — cd into app
cd mcp-proxy && mcpcli find-code "query"Option B — --cwd from root
mcpcli find-code "query" --cwd mcp-proxymcpcli outline mcp-proxy/src/cli.tsDEFAULT
Uploads an index from the folder on your machine. Private code never leaves unless you run the tool.
REMOTE
mcpcli get-context github:owner/repo or --path github:owner/repo
FORCE REMOTE
--no-local — requires repo access on your Zephex account
mcpcli safe expressmcpcli check-package next --task upgrade --from-version 14.2.0mcpcli check-package --from-lock --strict --jsonSee check_package and complete packages section.
| Command | MCP tool |
|---|---|
get-context | get_project_context |
find-code | find_code |
summarize / outline / symbol | read_code |
architecture | explain_architecture |
check-test | check_test |
think | keep_thinking |
check-package | check_package |
remember / recall / memory | project_memory |
check url | audit_headers |
docs | Zephex_dev_info |
keep_thinking (multi-turn)
Terminal has one-shot think/reason/debug-think; sessionId checkpoint flows are editor-only.
--json Raw MCP JSON--cwd <dir> Project / package root--no-local Use git remote instead of local upload--path github:o/r Explicit remote repo--api-key Override saved key